REVIEW · LONDON
Discover Photography
Book on Viator →Operated by Westland Place Studios · Bookable on Viator
Your camera stops being mysterious fast.
This beginner photography course in London is built for real learning: you get a clear, hands-on grip on manual controls and how to use them to create better travel photos. What makes it stand out is the mix of fundamentals (like aperture and shutter speed) plus a guided practice so you can try the settings while the questions are fresh. The session runs in a small group of no more than 12, which keeps things practical instead of lecture-heavy.
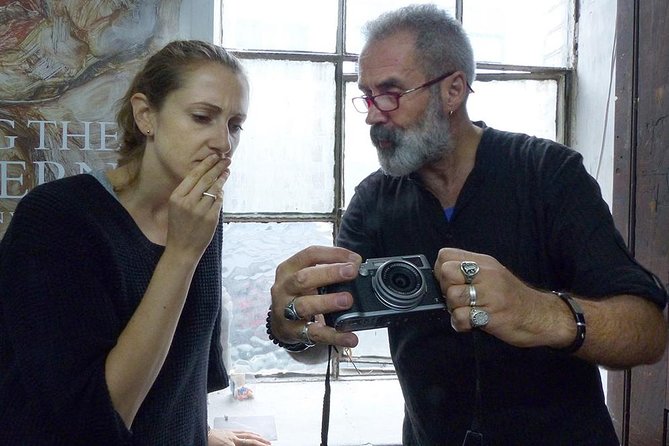
I like that the instruction doesn’t stay abstract. You work through how composition, lenses, and exposure work together, not as separate facts you forget later. You also get help from an award-winning photographer, and reviews specifically call out teachers such as Vehbi Koca and Pierre for explaining things in a straightforward way and answering queries. One consideration: to get the most out of it, you’ll need a DSLR or a compact digital camera with manual settings.
In This Review
- Key Takeaways Before You Go
- Why This 2.5-Hour Manual-Settings Class Feels Useful
- Your Meeting Point at Westland Place Studios (And What That Means)
- The Exposure Triangle: Aperture and Shutter Speed You’ll Actually Use
- Lenses, Focal Length, and Composition Without the Confusing Jargon
- White Balance and Color Temperature: Fixing the Most Common Travel Problem
- Switching Between Auto, Semi-Auto, and Manual Without Panic
- A Practical Exercise That Shows Effects, Not Just Theory
- Small Group Teaching: Why Max 12 Matters in London
- What Camera Gear You Need (So You Don’t Waste the Session)
- Price and Value: What You’re Paying For
- Who This Course Fits Best (And Who Might Want Something Else)
- Should You Book Discover Photography in London?
- FAQ
- How long is Discover Photography in London?
- What group size is it?
- Where is the meeting point?
- Do I need a specific camera?
- Is this course only for people with experience?
- Is there an age limit?
- Is it easy to reach with public transportation?
- What happens if I cancel?
Key Takeaways Before You Go
- Small group learning (max 12): you’ll have room to ask questions and try ideas.
- Manual settings, explained for beginners: you learn what to change and why it changes the photo.
- A practical exercise focused on aperture and shutter speed: you see effects instead of memorizing them.
- Lenses and perspective made practical: focal length, angle of view, and how perspective shifts.
- White balance and color temperature: so your colors look like what you saw.
- Instructor support for different cameras: guidance that works across camera setups, as long as you have manual control.
Why This 2.5-Hour Manual-Settings Class Feels Useful
A lot of beginner photography classes try to cover everything. This one is more grounded. You’re there to learn the controls that matter, then you practice using them right away so the buttons and numbers become decisions you can make on the next day in London.
The heart of the course is learning to connect settings to outcomes. When you change aperture, you don’t just get a different f-number—you get a different look, usually tied to depth of field. When you change shutter speed, you don’t just get motion blur—you control whether moving subjects feel sharp, silky, or ghostly. And ISO? It’s how you manage light without losing too much image quality. The course aims to make that relationship feel intuitive.
I also like that it’s designed for digital cameras and focuses on switching between automatic and manual behavior. That matters when you’re traveling, because you rarely want to shoot fully manual all day. You want to know when to use each mode and how to keep control.
You can also read our reviews of more photography tours in London
Your Meeting Point at Westland Place Studios (And What That Means)
You’ll start at Westland Place Studios, 11 Westland Pl, London N1 7LP, and you finish back at the same place. That matters because it keeps the session simple: you’re not juggling transfers, and you’re likely moving between instruction and practice without the stress of a long commute.
West London can be confusing for first-timers, but starting in one fixed spot is a big win. It also signals the class structure: you’re going to get the basics in a classroom-style setting, then put them into action nearby. Reviews mention the chance to apply the theory out and about, so expect at least part of the session to shift from talking to doing.
Also, this is a course with a mobile ticket, so you should be ready to show your ticket on your phone at the start.
The Exposure Triangle: Aperture and Shutter Speed You’ll Actually Use
If there’s one section that makes this course valuable, it’s the focus on how aperture and shutter speed affect the image. These two settings are where photography stops being “push button, hope for the best” and starts being creative.
Here’s how the concepts translate to travel photos:
- Aperture (f-stop) controls depth of field. In practical terms, it’s your tool for deciding whether your subject stands out against a soft background, or whether you want more of the scene sharp from foreground to back.
- Shutter speed controls motion. In a city, it’s your lever for handheld sharpness, freezing action, or creating a sense of movement.
The class also ties in ISO as part of the exposure equation—how to set the correct exposure and understand the relationship between aperture, shutter speed, and ISO. That helps you stop guessing when the light changes, like when you go from bright streets to darker indoor spots.
The course includes a practical exercise exploring the effects of aperture and shutter speed, and that’s what makes this more than a slideshow. You should come away knowing what to try when your photos look too dark, too blurry, or lacking that “wow” separation.
Lenses, Focal Length, and Composition Without the Confusing Jargon
You’ll also learn about lenses and the things people often gloss over. The session covers focal length, angle of view, and perspective. Those terms can sound technical, but the goal is practical: help you choose the right framing and understand why your photo looks the way it does.
This is a big deal in London because the city gives you endless subjects—buildings, street scenes, portraits, details—and each benefits from different visual choices.
- Focal length affects how much of the scene fits into your frame and how it feels visually.
- Angle of view connects to what you include and what you leave out.
- Perspective is what changes when you position yourself and when the lens compresses or stretches how the scene appears.
On top of that, you’ll get instruction in composition. That’s the part that helps your images look intentional. Even if your exposure is correct, a strong composition is what turns a technically good photo into a photo that makes people want to look longer.
White Balance and Color Temperature: Fixing the Most Common Travel Problem
London light can be tricky—bright skies one moment, gray shade the next. That’s why white balance matters. The course includes color temperature and white balance, and it trains you to get more consistent color without relying on automatic decisions every time.
In practical terms, white balance helps prevent the classic issue where a scene looks too orange, too blue, or just plain off compared to what your eyes experienced. When you learn what white balance is and how to adjust it, you can make your photos look more natural or more stylized on purpose.
This is also where the course becomes extra useful even after you leave. Once you understand color temperature, you start recognizing why a photo from the same location can look different day to day. You can correct it instead of deleting it.




Switching Between Auto, Semi-Auto, and Manual Without Panic
The course specifically teaches you to operate your camera in semi-automatic and manual modes. For many beginners, the fear is that manual means work and complication. The better goal is the one this class pushes: manual becomes a creative control tool, not a chore.
Semi-automatic modes (like aperture priority or shutter priority, depending on your camera) are a bridge. They let you lock in one choice and let the camera handle part of the exposure equation. Manual takes full control, so you can commit to the look you want.
You’ll learn when and how to switch between these approaches, and you’ll practice the thinking behind it. That kind of mental skill is what you carry back to your own camera roll.
A big plus: reviews highlight instructors who keep the group moving while answering questions, and who are willing to help you experiment. That style helps you avoid getting stuck on one button or one setting that refuses to behave.
A Practical Exercise That Shows Effects, Not Just Theory
The session includes a practical exercise that explores the effects of aperture and shutter speed. This is exactly the kind of activity that makes beginners confident, because you see the cause and effect immediately.
Instead of memorizing settings like they’re trivia, you get feedback loops:
- You change one variable.
- You compare the look in your photos.
- You learn what that variable actually does in real conditions.
That’s how you build usable intuition. And it’s also why this course is worth doing even if you’ve played with your camera for a while. Many people know the buttons exist but don’t know what they’re really for. This kind of exercise connects the menu to the image.
Small Group Teaching: Why Max 12 Matters in London
This class caps at 12 travelers, and that’s not just a nice-to-have. It directly affects how fast you get unstuck.
In a group that large, beginners tend to have similar questions—where to find manual controls, how exposure changes, what lens choice means, and how to interpret results. A small group helps the instructor answer those questions without leaving people behind.
Reviews back up this teaching approach. People describe the instructors as great leaders, with brilliant knowledge and a willingness to help no matter what camera you have, plus a teaching style that’s simple and easy to follow. That combination is important for a beginner course because your biggest obstacle is often not knowledge—it’s confusion plus time pressure.
What Camera Gear You Need (So You Don’t Waste the Session)
To get the most value, plan to bring a DSLR or a compact digital camera with manual settings. The course is designed around those controls, including manual and semi-automatic operation, and it covers lenses and exposure.
If you only use a smartphone, you might find it less aligned with what the class is teaching. The session is built for camera controls like aperture, shutter speed, ISO, and lens behavior. Still, if your compact camera has true manual control, you should be in the right place.
Also, if you’ve got a lens you’re comfortable with, bring it. You want to practice with the camera you’ll actually use once you’re traveling.
Price and Value: What You’re Paying For
At $95.80 per person for about 2 hours 30 minutes, you’re buying more than information. You’re paying for guided practice with an award-winning photographer in a small group, plus a structured set of topics that hit the core exposure and image-making decisions.
In London, that’s a solid value when you consider what usually happens to beginners on their own: you might spend hours reading, then still feel uncertain when you’re standing on a street and the light changes. This class compresses the learning curve and gives you a framework so your camera settings become tools you can use quickly.
Also, the “manual settings plus practice” angle is the key for value. A session that only talks theory is easier to forget. A session where you manipulate aperture and shutter speed, compare results, and learn what you’re seeing—that tends to stick.
Who This Course Fits Best (And Who Might Want Something Else)
This course is best for you if you:
- have a digital camera with manual controls and want to understand them fast
- want help connecting settings to images, especially aperture and shutter speed
- care about getting stronger travel photos without relying purely on automatic mode
- enjoy learning in a small group where you can ask questions
You might be less satisfied if you:
- don’t have a camera with manual settings (the course is explicitly geared for cameras like DSLR or compact digital)
- expect a tour focused on scenic stops rather than photo instruction (this is a learning session first)
Should You Book Discover Photography in London?
Yes, I’d book it if you’re ready to use your camera instead of just carrying it. The combination of manual settings fundamentals, lens and perspective basics, and a real practical exercise is exactly what turns beginner curiosity into usable skill.
Before you go, make sure you can access manual settings on your camera. If you can, you’re in great shape. And if you want an instructor-led class in London that stays friendly, practical, and focused, this one looks like a strong match for your trip.
FAQ
How long is Discover Photography in London?
It lasts about 2 hours 30 minutes.
What group size is it?
The class has a maximum of 12 travelers.
Where is the meeting point?
You meet at Westland Place Studios, 11 Westland Pl, London N1 7LP, UK.
Do I need a specific camera?
Yes. You’ll get the most out of it with a DSLR or a compact digital camera that supports manual settings.
Is this course only for people with experience?
No. It’s described as a beginner’s photography course focused on learning manual settings.
Is there an age limit?
The minimum age is 18. Children must be accompanied by an adult, and both must have paid tickets.
Is it easy to reach with public transportation?
Yes. The meeting point is near public transportation.
What happens if I cancel?
This experience is non-refundable and cannot be changed for any reason.